McDonald’s Copy: Bacon and Egg McMuffin

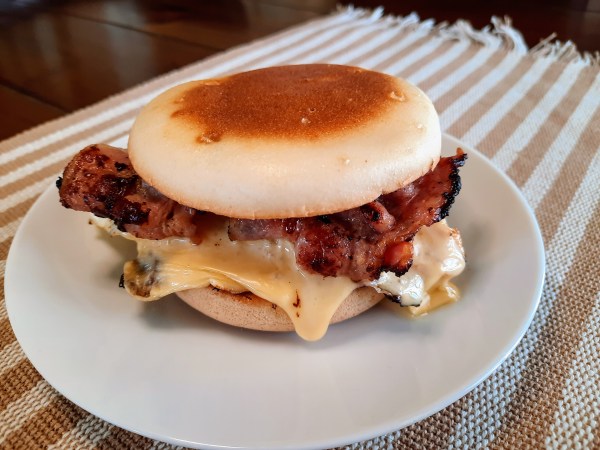
Guilty Pleasure: Bacon and Egg McMuffin

Food Prep Tip: Batch cook these, wrap in baking paper and cling wrap, then freeze. Then remove a frozen McMuffin from the freezer the night before needed to defrost in the fridge. You can then heat these (remove from cling film and heat in the baking paper) in a toasted sandwich machine for a quick and easy breakfast or lunch.

INGREDIENTS

  • 1 Tbsp Olive Oil
  • 2 Streaky Bacon strips
  • 1 Egg
  • 1 gluten free English Muffin, split in half
  • 1 processed Cheddar Cheese slice
  • Butter, to taste
  • Pepper, to taste

INSTRUCTIONS

  1. Add the olive oil to a pan and heat over medium-high heat.
  2. Add the bacon to the pan and cook. Once half way cooked, flip your bacon.
  3. Put your english muffin into the toaster and turn on.
  4. Push your bacon to the side of the pan once cooked. Crack your egg and add your egg to the pan. Use an egg ring if you’re after the classic McDonald’s shape.
  5. Flip the egg once half cooked, and add the cheese slice on top.
  6. Butter your toasted english muffin, add your bacon onto the bottom half, and your egg & cheese on top. Sprinkle with pepper, and add the top of your muffin.
  7. Serve immediately; or if batch cooking: cool, wrap in baking paper, and then cling film before freezing.

Chicken, Cranberry & Camembert Pizza

A Treat for your Taste Buds: Chicken, Cranberry & Camembert Pizza

INGREDIENTS

  • 250g Chicken, cooked, shredded, sliced, or diced into small cubes
  • 2x gluten free Pizza Bases
  • 2 C Cheddar Cheese, grated
  • 125g Camembert Cheese, sliced in about 0.5cm pieces and halved
  • 180g Cranberry Jelly

INSTRUCTIONS

  1. Pre-heat the oven to 180°C.
  2. Place each pizza base on an oven proof tray, then slather each pizza base in 90g of the cranberry jelly.
  3. Cover each pizza base in half each of the grated cheddar cheese.
  4. Add the camembert cheese pieces over each pizza base, along with the chicken pieces.
  5. Place the pizzas in the oven and cook for 20 minutes.
  6. Serve immediately while hot.

SERVE WITH

A green salad.

Teriyaki Chicken Sushi

Light: Teriyaki Chicken Sushi

INGREDIENTS

  • Rice: 1 1/2 C Short Grain Rice, uncooked
  • Water
  • 1/3 C Rice Vinegar
  • 1 Tbsp White Sugar
  • 1 Tsp Salt
  • Marinade: 1/2 C gluten free Soy Sauce
  • 2 Tbsp Brown Sugar
  • 1 1/2 Tsp Ginger, minced
  • 1 Tbsp Garlic Oil
  • 3 Tbsp Mirin
  • Sushi Roll: 1 Chicken Breast, sliced
  • 1 Capsicum, deseeded and sliced
  • 100g Cucumber, sliced
  • 1 Avocado, deseeded and sliced
  • Lettuce, a handful
  • 4x Seaweed sheets
  • Water

INSTRUCTIONS

  1. Add the soy sauce, brown sugar, ginger, garlic oil, and mirin to a bowl and combine well. Add the chicken breast to the bowl and mix, ensuring that the marinade covers the chicken.
  2. Cover the bowl and marinate the chicken for a minimum of 5 minutes, ideally a few hours.
  3. Wash your rice then add to rice cooker along with water (enough that it covers the rice plus the length of your finger tip) and turn on.
  4. Once rice has cooked, turn the rice cooker off. Add the rice vinegar, sugar, and salt to the rice and stir through until absorbed. Leave to cool.
  5. Heat a pan to a medium-high heat, and add the chicken. Cook through, flipping over half way through to cool both sides.
  6. Lay a seaweed sheet on top of a sushi rolling mat. Place a quarter of the cooled rice on top, and spread over the entire sheet, leaving only a 1-2cm strip across the length at the far end of the sheet.
  7. At the end closest to you, make a line across the length of each ingredient – teriyaki chicken, lettuce, capsicum, cucumber, avocado.
  8. Wet all of the lengthways seaweed strip with water.
  9. Using the rolling mat, tuck in the ingredients and roll tightly. The wet seaweed strip will glue the roll together.
  10. Place the roll onto a chopping board, and using a sharp knife, cut the sushi roll into pieces.

Chicken and Peanut Stir Fry

Sizzling: Chicken and Peanut Stir Fry

INGREDIENTS

  • 1 Tbsp Garlic Oil
  • 1 Chicken Breast, boneless and skinless, large, sliced thinly or diced (or Tofu for a vegetarian option)
  • 1 Capsicum, sliced (150g)
  • 1 Zucchini, sliced into half moons (200g)
  • 1 Carrot, thin slices or half moons (120g)
  • 100g Broccoli, florets
  • 200g Oyster Mushrooms (fresh or tinned – drained and rinsed)
  • 2 Spring Onion, green tops only
  • 1/3 C GF Soy Sauce
  • 2 Tbsp GF Oyster Sauce
  • 2 Tsp White Sugar
  • 3 Bird’s Eye Chilli, seeds removed and sliced (more if you like it spicy)
  • 100g Roasted, Unsalted, Peanuts
  • 1 1/2 C Jasmine Rice
  • Water

INSTRUCTIONS

  1. Wash your rice then add to rice cooker along with water (enough that it covers the rice plus the length of your finger tip) and turn on.
  2. Prepare vegetables and sauces (this is a fast dish so everything needs to be ready to go)
  3. Heat garlic oil in a wok over high heat.
  4. Add chicken and toss regularly. Note: Throughout this dish, you will need to continue tossing regularly until served.
  5. When chicken is half cooked, add the carrots.
  6. Once the carrots are almost ready, add the capsicum, zucchini, and broccoli. Cook for a couple of minutes.
  7. Add the chilli, mushrooms, spring onions, soy sauce, oyster sauce, and white sugar.
  8. Once combined, add the peanuts and stir through.
  9. Remove from heat, and serve alongside cooked rice.

ALTERNATIVES

Remove the chicken or switch it out for tofu for a vegetarian option, or pair this with prawns, beef, or pork for alternative meat options.

Beef Burritos

  • 500g Beef Mince
  • 400g Tinned Chopped Tomatoes
  • 200g Black Beans (limited to 40g a serve if following a FODMAP diet), optional
  • 2 Tbsp Tomato Paste/Tomato Sauce (check it’s free of FODMAPs)
  • 1 Tbsp Garlic Oil
  • 1 tsp ground Cumin
  • 1 tsp dried Oregano
  • 1 tsp GF Beef Stock Powder
  • 1/2 tsp ground Chilli Powder (more if you like it spicy, less if you don’t)
  • 1/4 tsp Salt
  • Gluten free Tortillas, approx. 8

INSTRUCTIONS

  1. Add garlic oil to pan and heat to medium-high heat.
  2. Add beef to pan, cooking through until browned.
  3. Add cumin, chilli powder, salt, and oregano and stir through.
  4. Add beans (if using), diced tomatoes, beef stock powder, and tomato paste/sauce. Simmer sauce until slightly reduced.
  5. Heat a separate pan to medium-high heat. Heat each tortilla on both sides until just starting to brown.
  6. Serve tortillas and beef immediately, along with accompaniments.

SERVE WITH

Guacamole, mexican rice, tomatillo salsa, coriander, grated cheese, sour cream (limited to 40g a serve if following a FODMAP diet), and chopped lettuce or cabbage.

Vietnamese Prawn Rice Rolls

Light and Summery: Vietnamese Prawn Rice Rolls

Serves 2

INGREDIENTS

  • 200g Prawns, raw
  • 1/2 Carrot, thinly sliced or grated
  • 100g Cucumber, thinly sliced
  • 50g Red Cabbage, thinly sliced or grated
  • 200g Rice Vermicelli, cooked
  • 1 Tsp Garlic Oil
  • 10g Butter
  • Chilli Flakes, to taste
  • 1 Tbsp Lemon Juice
  • Coriander, a few sprigs, to taste. Separate into individual leaves.
  • Mint, a few sprigs, to taste. Separate into individual leaves.
  • Rice Paper Wrappers, small or large
  • Warm (not hot) water
  • Dipping Sauce – Vietnamese Dipping Sauce

INSTRUCTIONS

  1. Prepare dipping sauce now, or after step 5.
  2. Prep your ingredients.
  3. Heat garlic oil and butter in a pan over a high heat. Add raw prawns to pan in a single layer.
  4. Add a sprinkle of chilli flakes to the prawns, to taste. Cook prawns until starting to turn pink and browning on one side. Flip and cook through, then remove from heat.
  5. Add lemon juice to pan and mix through prawns.
  6. Add warm water to a medium-large bowl until it is almost full. Add your rice paper wrapper into the bowl and submerge for about 5 seconds. Remove from bowl and place onto a damp surface (too dry or too wet and your wrapper may tear).
  7. Add a small amount of your prawns, vegetables, rice vermicelli, and herbs on the top third of the wrapper. Don’t add too much or your roll will not be able to stick together properly.
  8. Roll it up by folding the two sides up, then pull the bottom of the roll up and over the filling and tuck in the other side, before rolling the rest of the way.
  9. Repeat for the remaining filling & rice paper wrappers.
  10. Serve with dipping sauce.

ALTERNATIVES

  • Use marinated tofu for a vegetarian filling, or pork, beef, or chicken for alternative meat options.
  • A peanut satay dipping sauce is also a tasty choice.

Egg Fried Rice

Authentic: Egg Fried Rice

INGREDIENTS

  • 60g Peas
  • 100g Green Beans, 2cm pieces
  • 1 large Carrot, diced
  • 4 Eggs, whisked
  • 2 1/2 C cooked Rice (cooked the day before for best results)
  • 3 Tbsp Garlic Oil
  • 1 Tbsp Peanut Oil
  • 1 Tbsp Sesame Oil
  • 1 Tbsp Soy Sauce
  • 1 Tbsp Monosodium Glutamate (MSG)
  • Spring Onions, green tops only, chopped, to serve

INSTRUCTIONS

  1. Heat garlic oil in wok over high heat. Add prepared vegetables and cook through.
  2. Move vegetables to the side of the wok and add egg. Scramble egg in wok. Move egg to the side with the vegetables.
  3. Add peanut oil to pan and add rice. Break rice up in pan so that it is loose and not squished together (from overnight storage). Add sesame oil and mix through rice.
  4. Toss vegetables, egg, and rice together.
  5. Add soy sauce and MSG to wok and mix through.
  6. Serve immediately once thoroughly mixed.

ALTERNATIVES

  • Instead of peas, green beans, and carrots, add 2 1/2 C of any of your favourite vegetables.
  • For a meaty option, add cooked chicken, beef, pork, or prawns to your fried rice in step 4 and heat through.

Paneer Saag

Vibrant: Paneer Saag

INGREDIENTS

  • 600g Paneer
  • 1 tsp Ground Tumeric
  • 1 tsp Chilli Powder (quite mild, add more if you like it spicy)
  • 1 tsp Salt
  • 8 Tbsp Garlic Infused Oil
  • 1/2 C Water
  • 1kg Spinach
  • 4 tsp Cumin Seeds
  • 4 tsp Garam Masala
  • 4 Tbsp Lemon Juice
  • 2/3 C Greek Yoghurt
  • 1C Rice – cooked, to serve

INSTRUCTIONS

  1. Cut the paneer into even chunks, approximately 3x1cm each cube, and put into a bowl.
  2. Add the tumeric, chilli powder, and salt into the bowl and toss to coat. Marinate up to 24 hours.
  3. Heat 6 tablespoons of garlic infused oil in a pan. Fry the paneer until golden. Remove from pan and set aside.
  4. Add the remaining garlic infused oil to the pan. Add the cumin seeds and garam masala. Fry until fragrant.
  5. Add spinach to the pan with the water, cover, and simmer until wilted.
  6. Transfer the spinach mixture to a blender or food processor. Add the lemon juice, and yogurt.
  7. Blitz to a chunky or smooth puree, depending on preference, and return to the pan. Stir through the fried paneer and heat through. Season to taste with salt and more lemon juice if needed. Serve immediately.

SERVE WITH

Cooked rice.

ALTERNATIVES

Instead of paneer, try a meat option such as chicken or beef.

Website Powered by WordPress.com.

Up ↑